本文最后更新于 2024-03-27T11:44:59+08:00
日志
2023年8月20日
尚硅谷 截止 P145
pink P196 - P300 跳过品优购、动画
2023年8月21日
pink P390
2023年8月22日
P415 京东首页 流式布局
2023年8月23日
P454
2023年8月24日
学习grid,跳过苏宁,黑马面面
2023年8月25日
结束HTML+CSS,跳过阿里百秀、bilibili
2023年8月26日
阅读SAST skill docs JavaScript部分,至异步
2023年8月27日
SAST JavaScript完结
pink JavaScript API day2完结
2023年8月29日
API day4
2023年8月29日
API结束,未看注册案例
2023年9月1日
结束js,开始ajax,结束ajax
2023年9月2日
小满vue ,启动!
2023年9月3日
跳过P10(响应式原理)
2023年9月4日
完成P15
2023年9月5日
完成P20,P20异步组件跳过
2023年9月6日
完成P30
2023年9月11日
跳过P33 p35 P37 P38(tsx, v-model)
2023年9月13日
跳过P41 自定义hooks
2023年9月17日
开始看张天禹
2023年9月19日
看完P13
2023年9月20日
看完P20
2023年9月21日
看完P30
2023年9月22日
看完P47
2023年9月23日
看完P59
2023年10月1日
看完P72
2023年10月2日
看完P89
2023年10月3日
看完P117
Vue 1 wget https://labfile.oss.aliyuncs.com/courses/1262/vue.min.js
工程化 计算、侦听与过滤器、生命周期钩子
1 2 3 4 5 6 7 8 9 10 11 12 13 14 15 16 17 18 19 20 21 22 23 24 25 26 27 28 <body > <div id ="app" > <p > 我名字正着写:{{name}}</p > <p > 计算出我名字倒着写:{{reverseName}}</p > </div > <script > var app = new Vue ({ el : "#app" , data : { goodsList : {, name : "实验楼" , }, computed : { reverseName : function ( return this .name .split ("" ).reverse ().join ("" ); }, }, mounted ( axios.get ('goodsList.json' ).then (val => this .goodsList = val.data ; }) } }); </script > </body >
生命周期函数是在特定时间点执行的函数,其中this的指向为vm或组件
当你的计算属性的依赖数据发生改变时,你的相关计算属性也会重新计算
set与get: 给this.计算属性赋值会自动调用计算属性.set
set:
1 2 3 4 5 6 7 8 9 10 11 12 13 14 15 16 17 18 19 20 21 22 23 24 25 26 27 28 29 30 31 32 33 34 35 36 37 38 39 40 41 42 43 44 45 46 47 <body > <div id ="app" > <p > firstName:{{firstName}}</p > <p > lastName:{{lastName}}</p > <p > 全名是:{{fullName}}</p > <button v-on:click ="changeName" > 改姓</button > </div > <script > var app = new Vue ({ el : "#app" , data : { firstName : "王" , lastName : "花花" , }, methods : { changeName : function ( this .fullName = "李花花" ; }, }, computed : { fullName : { get : function ( return this .firstName + this .lastName ; }, set : function (newName ) { var name = newName; this .firstName = name.slice (0 , 1 ); this .lastName = name.slice (1 ); }, }, fullname :function ( return this .firstName + this .lastName ; } fullname ( return this .firstName + this .lastName ; } }, }); </script > </body >
观察和响应 Vue 实例上的数据变动,侦听属性
监控msg,当msg改变是,调用对应的函数
1 2 3 4 5 6 7 8 9 10 11 12 13 14 15 16 17 18 19 20 21 22 23 24 25 26 27 28 29 <body > <div id ="app" > <p > {{msg}}</p > <button @click ="handleClick('hello syl')" > 改变msg</button > </div > <script > var app = new Vue ({ el : "#app" , data : { msg : "hello" , }, methods : { handleClick : function (val ) { this .msg = val; }, }, watch : { msg : function (newVal, oldVal ) { alert ("新值" + newVal + "----" + "旧值" + oldVal); }, }, }); </script > </body >
在 Vue 中我们有一个专门处理数据过滤的东西:过滤器。过滤器可以用在两个地方:双花括号插值和 v-bind 表达式
1 2 3 4 <p > {{msg2|getString}}</p > <p v-bind:class ="msg2|getString" > </p > <p v-bind:class ="getstring(msg2)" > </p >
1 2 3 4 5 6 7 8 9 10 11 12 13 14 15 16 17 18 19 20 21 22 23 24 25 26 27 28 29 30 31 32 33 34 35 <body > <div id ="app" > <p > 小写转换大写:过滤前:{{msg}} 过滤后: {{msg|toUpperCase}}</p > <p > 去除数字:过滤前:{{msg2}} 过滤后: {{msg2|getString}}</p > </div > <script > var app = new Vue ({ el : "#app" , data : { msg : "hello" , msg2 : "1s2y3l" , }, filters : { toUpperCase : function (val ) { return val.toUpperCase (); }, getString : function (val ) { let newVal = "" ; val.split ("" ).map (function (item ) { if (9 >= item && item >= 0 ) { return ; } else { return (newVal += item); } }); return newVal; }, }, }); </script > </body >
组件 简介 非单文件组件
1 2 3 4 5 6 7 8 9 10 11 12 13 14 15 16 17 18 19 20 21 22 23 24 25 26 27 28 29 30 31 32 33 <div id ="app" > <xuexiao > </xuexiao > </div > <script src ="https://cdn.jsdelivr.net/npm/vue/dist/vue.js" > </script > <script type ="text/javascript" > const school = Vue .extend ({ template : ` <div> <h2>学生姓名:{{studentName}} </h2> <h2>学生年龄:{{age}} </h2> </div> ` , data ( return { studentName : "张三" , age : 18 , }; }, }); const vm = new Vue ({ el : "#app" , components : { xuexiao : school, }, }); </script >
单文件组件
1
2
3
4
5
6
7
8
9
10
11
12
13
14
15
16
17
18
19
20
21
22
23
24
25
26
27
28
29
30
31
32
33
34
35
36
37
38
<tempalte>
全局组件:Vue.component
1 2 3 4 <syl > </syl > <h1 > 实验楼全局组件</h1 > ",
局部组件
1 2 3 4 5 6 7 8 9 10 11 12 13 14 15 16 17 18 19 20 21 22 23 24 25 26 27 28 29 30 31 32 33 <body > <div id ="header" > <syl-header > </syl-header > </div > <div id ="mid" > <syl-mid > </syl-mid > </div > <script > var childComponent = { template : "<h2>我是实验楼局部组件header,只有我们父级才能调用</h2>" , }; var childComponent2 = { template : "<h2>我是实验楼局部组件mid,只有我们父级才能调用</h2>" , }; var header = new Vue ({ el : "#header" , components : { "syl-header" : childComponent, }, }); var mid = new Vue ({ el : "#mid" , components : { "syl-mid" : childComponent2, }, }); </script > </body >
组件的优点就在于能够复用,一次代码编写,整个项目受用。
注意: 复用组件内的 data 必须是一个函数,如果是一个对象(引用类型),组件与组件间会相互影响,组件数据不能独立管理
1
2
3
4
5
6
7
8
9
10
11
12
Vue .component ("button-counter" , {data (return {counter : 0 ,template : '<button @click="counter++">{{counter}}</button>' ,var app = new Vue ({el : "#app" ,
通信 父子:props
1 2 3 4 5 6 7 8 9 10 11 12 13 14 15 16 17 18 <body > <div id ="app" > <title-component post-title ="syl1" > </title-component > <title-component post-title ="syl2" > </title-component > <title-component post-title ="syl3" > </title-component > </div > <script > Vue .component ("title-component" , { props : ["postTitle" ], template : "<p>{{postTitle}}</p>" , }); var app = new Vue ({ el : "#app" , }); </script > </body >
子父通信this.$emit('自定义事件名',参数)
子组件向父组件数据传递套路:
第一步:子组件绑定事件。
第二步:子组件绑定事件触发,使用 $emit 创建自定义事件并传入需要传值给父组件的数据。
第三步:在子组件标签上 用 v-on 绑定自定义事件,在父组件中声明自定义事件处理的方法。
第四步:父组件方法,接受自定义事件传的参数,就完成了整个由下到上的数据流。
1 2 3 4 5 6 7 8 9 10 11 12 13 14 15 16 17 18 19 20 21 22 23 24 <body > <div id ="app" > <child-component v-on:send-msg ="getMsg" > </child-component > </div > <script > Vue .component ("child-component" , { template : `<button v-on:click="$emit('send-msg','我是子组件请求与你通信')">Click me</button>` , }); var app = new Vue ({ el : "#app" , methods : { getMsg : function (msg ) { alert (msg); }, }, }); </script > </body >
props类型检测 通常你希望每个 prop 都有指定的值类型。这时,你可以以对象形式列出 prop,这些属性的名称和值分别是 prop 各自的名称和类型
1 2 3 4 5 6 7 8 9 10 11 12 13 14 15 16 17 18 19 20 21 22 23 24 25 <body > <div id ="app" > <child-component id ="1" title ="hello syl" content ="you are welcom" > </child-component > </div > <script > // 注册一个子组件 Vue.component("child-component", { // props 对象形式,传递属性值 进行类型检测,在脚手架环境中很有用 props: { id: Number, title: String, content: String, }, // 使用 es6 模板字符串书写格式更优美 template: `<div > <p > id: {{id }} </p > <p > title:{{title }} </p > <p > content:{{content }} </p > </div > `, }); var app = new Vue({ el: "#app", }); </script > </body >
动态组件、实例生命周期 本地应用 示例 1 2 3 4 5 6 7 8 9 10 11 12 13 14 15 16 17 18 19 20 21 22 23 24 25 26 27 <script src="https://cdn.jsdelivr.net/npm/vue/dist/vue.js" ></script><script type ="text/javascript" > var vm = new Vue ({ el : '#vue_det' , data : { site : "菜鸟教程" , url : "www.runoob.com" , alexa : "10000" }, data ( return { site : "菜鸟教程" , } } methods : { details : function ( return this .site + " - 学的不仅是技术,更是梦想!" ; } } }) </script >
初始化:向Vue构造函数中传入一个集合
el: 选择器,设置Vue实例挂载(管理)的元素
data: 插值数据
method: 方法
vm.sute可以这样用vm.$el, vm.$data 它们都有前缀 $,以便与用户定义的属性区分开来
模板语法 插值 {{ name }}
name 为Vue中data的元素
v-html、v-text 用于替换为html代码
1 2 3 4 5 6 7 8 9 10 <div id="app2" ><div v-html ="message" > </div > let app2 = new Vue ({el : '#app2' ,data : {message : '<h1>菜鸟教程</h1>'
v-on
1 2 3 4 5 6 7 8 9 10 11 12 13 14 15 16 <input v-on :click="doIt" >"doIt(p1, p2)" > enter ="sayHi" > let vm=Vue ({data :{food : "西蓝花" ,methods :{doIt : function (p1, p2 ){this .food
动态的事件:
1 2 3 @[event]='doIt' 'click'
默认有冒泡,添加.prevent可以阻止冒泡
键盘事件:
在监听键盘事件时,我们经常需要检查详细的按键。Vue 允许为 v-on 在监听键盘事件时添加按键修饰符
v-show、v-if 根据表达式的真假,切换元素的显示和隐藏
1 2 3 4 5 6 7 v-show="isShow" "age>=18" data :{isShow : false ,age : 16
v-if: 同上,但操作dom元素(转换为注释节点),性能差
v-bind 单向数据绑定:v-bind
双向数据绑定:v-model
==属性变量化==
设置元素的属性(src, title, class)
可以多个
1 2 3 4 5 v-bind :src="imgSrc" data :{" "
1 2 3 4 5 6 v-bind : class ="isActive ? 'active' : '' " bind : class ="{'active': isActive, 'red-bg': isRed}" data :{isActive : true ;
1 2 <div class='c' :class="['a', 'b']">
bind可以是数组
可以同时有动态否认和静态的class
v-bind可以省略,如:
:src="imgSrc"
元素style绑定:
1 2 3 4 5 6 7 8 9 10 11 12 13 14 <body > <div id ="app" > <p v-bind:style ="{fontSize:size,backgroundColor:bgColor}" > 你好,实验楼</p > </div > <script > var app = new Vue ({ el : "#app" , data : { size : "26px" , bgColor : "pink" , }, }); </script > </body >
v-for 1 2 3 4 5 6 7 8 9 10 11 12 13 14 15 16 17 18 19 <ul id="app" ><li v-for ="(item, index) in arr" > {{index}} {{ item }} </li > <script src ="https://cdn.jsdelivr.net/npm/vue/dist/vue.js" > </script > <script > var app=new Vue ({ el :"#app" , data :{ arr :[1 ,2 ,3 ,4 ,5 ], objArr :[ {name : 'jack' }, {name : 'rose' }, ] } }) </script >
还是由于 JavaScript 的限制,Vue 不能检测对象属性的添加或删除,直接进行 app.userInfo.height='180cm' 这样操作是不会构成响应式,不会触发视图更新。必须使用 Vue.set(object, key, value) 方法向嵌套对象添加响应式属性
eg.
1 Vue .set (app.objArr , 'name' , 'andy' );
v-once 内容只渲染一次,不会改变
v-memo 1 2 3 4 5 6 7 8 9 10 11 12 <script setup lang="ts" >const arr :number[] = [1 ,2 ,3 ,4 ,5 ,6 ,7 ,8 ,9 ,10 ];<template > <div v-for ="item in arr" v-mome ="[item == 2]" > {{ item }} </div > </template > <style scoped > </style >
v-cloak 当vue初始化完成时,这个属性会直接消失
用例:
1 2 3 [v-cloak] {display : none;
官方文档 组件基础 监听事件 子组件可以用$emit来抛出事件
1 2 3 4 5 6 7 8 9 10 11 12 13 14 15 16 <template>
1 2 3 4 5 6 7 8 9 10 11 12 13 14 15 16 17 18 19 20 21 22 23 24 25 <template>
描述:
子组件中,可以以@click="$emit('enlarge-text')"这样的形式,把点击事件绑定到enlarge-text函数上(官方描述:子组件可以通过调用内置的 $emit方法,通过传入事件名称来抛出一个事件 。父组件有@enlarge-text监听,会完成这一事件的效果)
在子组件中,需要使用defineEmits宏来声明需要抛出的事件
深入组件 注册 全局注册 1 2 3 4 5 6 7 8 9 import {createApp} from 'vue' const app=createApp ({})component ('MyComponent' ,
注册导入的单文件组件
1 2 3 import MyComponent from './App.vue' component ('MyComponent' , MyComponent )
使用:
1 2 3 4 <ComponentA /> <ComponentB /> <ComponentC />
局部注册
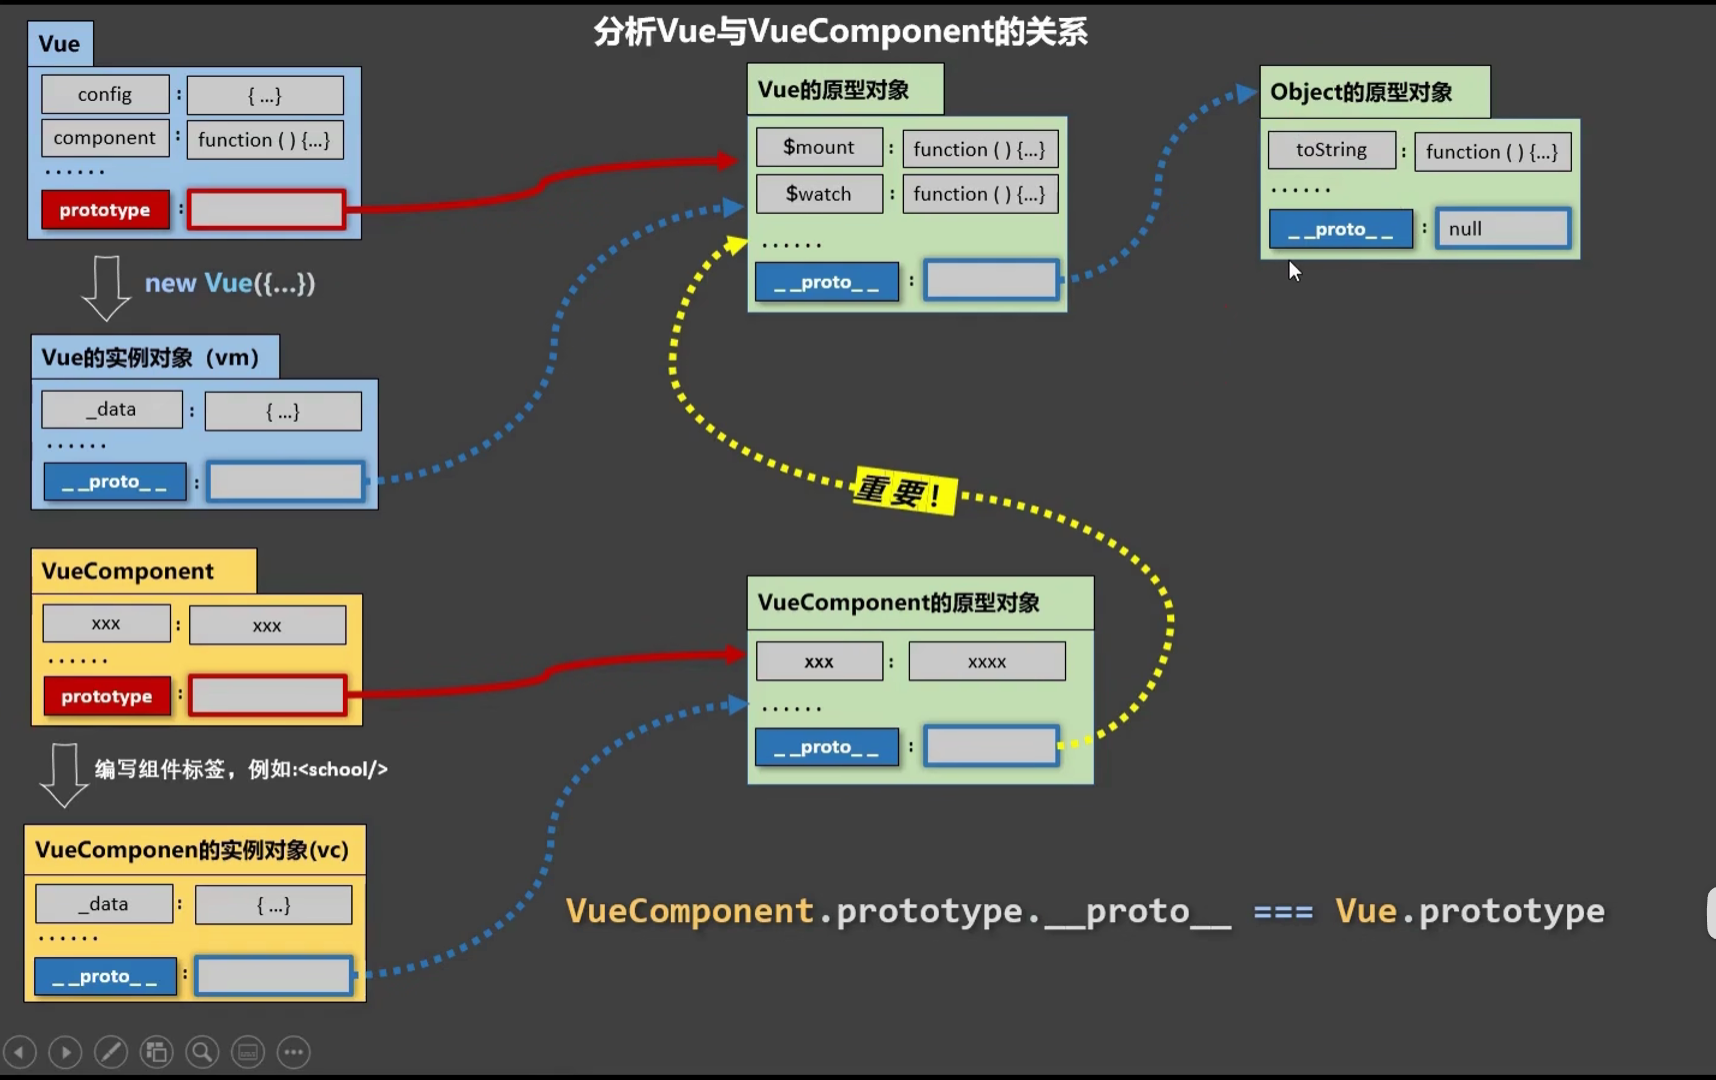
关于VueComponent:
1.school组件本质是一个名为VueComponent的构造函数,且不是程序员定义的,是Vue.extend生成的。*
2.我们只需要写
即Vue帮我们执行的:new VueComponent(options)。
3.特别注意:每次调用Vue.extend,返回的都是一个全新的VueComponent!!!!
4.关于this指向:
(1).组件配置中:
data函数、methods中的函数、watch中的函数、computed中的函数 它们的this均是【VueComponent实例对象】。
(2).new Vue(options)配置中:
data函数、methods中的函数、watch中的函数、computed中的函数 它们的this均是【Vue实例对象】。
5.VueComponent的实例对象,以后简称vc(也可称之为:组件实例对象)。
Vue的实例对象,以后简称vm。*
1 类.prototype __proto__
他们指向同一个东西
尚硅谷 文档:https://v2.cn.vuejs.org/v2/guide/
个人笔记:
核心 挂载
1 2 3 4 5 6 7 8 9 10 11 12 13 <script > new vue ({ el : '#root' , data :{ name : '尚硅谷' }, methods : { func ( } }, }) </script >
或者:
1 2 3 4 5 6 7 8 <script > let vm = new Vue ({ data ( return { name : "atguigu" }; }, }); vm.$mount("#root" ); </script >
可以直接通过vm访问data的属性,这是因为data的所有属性都通过Object.defineProperty方法进行了数据代理 ,代理到了vm上
Object.defineProperty方法
1
2
3
4
5
6
7
8
9
10
11
12
13
14
15
16
17
18
19
20
21
22
23
24
25
26
27
<script type ="text/javascript" > let number = 18 let person = { name :'张三' , sex :'男' , } Object .defineProperty (person,'age' ,{ get ( console .log ('有人读取age属性了' ) return number }, set (value ){ console .log ('有人修改了age属性,且值是' ,value) number = value } }) <script/>
计算属性 1 2 3 4 5 6 7 8 9 10 11 12 13 14 15 16 17 18 19 20 21 22 23 24 25 26 27 28 29 30 <script type ="text/javascript" > Vue .config .productionTip = false const vm = new Vue ({ el :'#root' , data :{ firstName :'张' , lastName :'三' , x :'你好' }, computed :{ fullName :{ get ( console .log ('get被调用了' ) return this .firstName + '-' + this .lastName }, set (value ){ console .log ('set' ,value) const arr = value.split ('-' ) this .firstName = arr[0 ] this .lastName = arr[1 ] } } } }) </script >
setter:这个函数会在fullName被修改的时候执行。如果计算属性要被修改,那必须写set函数去响应修改,且set中要引起计算时依赖的数据发生改变(如修改firstName和lastName)。getter:fullName以来的数据发生变化时被调用
计算属性可以只写getter:
1 2 3 4 5 computed :{fullName2 (return this .firstName + "-" + this .lastName ;
监视属性 首先指定要监视的值,当这个值放生改变时,会自动执行指定的函数
1 2 3 4 5 6 7 8 9 10 11 12 13 14 15 16 17 18 19 20 21 22 23 24 25 26 27 28 29 30 31 32 33 34 35 36 37 38 39 40 41 42 <!DOCTYPE html > <html lang ="en" > <head > <meta charset ="UTF-8" /> <meta name ="viewport" content ="width=device-width, initial-scale=1.0" /> <title > Document</title > </head > <body > <div id ="app" > <div > 今天天气{{ val }}</div > <button @click ="change" > change</button > </div > <script src ="../js/vue.js" > </script > <script > const vm = new Vue ({ el : "#app" , data : { flag : true , }, computed : { val ( return this .flag ? "炎热" : "凉爽" ; }, }, methods : { change ( this .flag = !this .flag ; }, }, watch : { flag : { immediate : true , deep : true , handler (newVal, oldVal ) { console .log ("修改了!" ); }, }, }, }); </script > </body > </html >
简写:
1 2 3 4 5 watch : {flag (newVal, oldVal ) {console .log ("修改了!" );
有的功能,watch可以完成,但computed不一定能完成
所被Vue管理的函数,最好写成普通函数,这样this的指向才是vm 或 组件实例对象。
所有不被Vue所管理的函数(定时器的回调函数、ajax的回调函数等、Promise的回调函数),最好写成箭头函数,这样this的指向才是vm 或 组件实例对象。
添加一个属性 1 Vue .set (this .student , 'sex' , '男' )
过滤属性 要用到管道运算符
1 2 3 4 5 6 7 8 9 10 11 12 <html > <div > {{111111 | timeFormater}} </div > </html > <script > new Vue ({ filters : { timeFormater (time ) { return time / 1000 ; }, }, }) </script >
自定义指令 函数式:
1 2 3 4 5 6 7 8 9 10 11 12 13 14 15 16 17 18 19 20 21 22 23 24 25 26 27 28 <!DOCTYPE html > <html lang ="en" > <head > <meta charset ="UTF-8" /> <meta name ="viewport" content ="width=device-width, initial-scale=1.0" /> <title > Document</title > </head > <body > <div id ="app" > <span v-big ="n" > </span > </div > </body > <script src ="../js/vue.js" > </script > <script > new Vue ({ el : "#app" , data : { n : 99 , }, directives : { big (element, binding ) { element.innerText =binding.value *10 }, }, }); </script > </html >
big 函数调用时机:
指令与元素成功绑定时(一上来)
指令所在的模块被重新解析时
对象式:
1 2 3 4 5 6 7 8 9 10 11 12 13 14 15 16 directives :{fbind :{bind (element,binding ){value = binding.value inserted (element,binding ){focus ()update (element,binding ){value = binding.value
全局指令:
1 2 3 4 5 6 7 8 9 10 11 12 13 14 Vue .directive ('fbind' ,{bind (element,binding ){value = binding.value inserted (element,binding ){focus ()update (element,binding ){value = binding.value
组件基础 创建组件 1 2 3 4 5 6 7 8 9 10 11 12 13 14 15 16 17 18 19 20 21 22 23 24 25 26 27 28 29 30 31 32 33 34 35 36 37 38 39 40 41 42 43 44 45 46 47 48 49 50 51 52 53 54 <!DOCTYPE html > <html lang ="en" > <head > <meta charset ="UTF-8" > <meta name ="viewport" content ="width=device-width, initial-scale=1.0" > <title > Document</title > </head > <body > <div id ="root" > <school > </school > <hr > <stu > </stu > </div > </body > <script src ="../js/vue.js" > </script > <script > const school = Vue.extend({ template:` <div > <div > 姓名: {{name }} </div > <div > 地址: {{address }} </div > </div > `, data(){ return { name: '阿巴阿巴', address: '唐宁街一号', } } }) const stu = Vue.extend({ template:` <div > <div > 姓名: {{name }} </div > <div > 性别: {{sex }} </div > </div > `, data(){ return { name: '张三', sex: '男', } } }) const vm = new Vue({ el:'#root', // 局部注册 components:{ school, stu } }) </script > </html >
组件需要复用,故data应写成函数,并把数据包裹在返回值中
全局组件
1 2 3 4 5 6 7 8 9 10 const hello = Vue .extend ({name : '我是hello' , template :`<div>{{ hello }}</div>` ,data (return {hello : 'hello' Vue .component ('hello' , hello)
const hello = Vue.extend({})可以简写为:const hello = {}
props 父组件:
1 2 3 4 5 6 7 8 9 10 11 12 13 14 15 16 17 18 19 20 <template>
子组件
1 2 3 4 5 6 7 8 9 10 11 12 13 14 15 16 17 18 19 20 21 22 23 24 <template>
上面父组件的传参写法中,传出的只能是字符串,
1 <StudentCom :name ="张三" :sex ="男" :age ="18" > </StudentCom >
这样,传出去的是表达式
对于子组件,这些数据是只读 的
mixin 1 2 3 4 5 6 7 8 9 10 11 12 13 14 15 16 17 18 19 20 21 22 23 24 25 26 <template>
1 2 3 4 5 6 7 8 9 10 11 export const hunhe = {methods : {showName (alert (this .msg )mounted (console .log ('泥嚎呀' )
完成属性的复用
全局混合:
插件 定义:
1 2 3 4 5 6 7 8 9 10 11 12 13 14 15 16 17 18 19 20 21 22 23 24 25 26 27 28 29 30 31 32 33 34 35 36 37 38 39 export default {install (Vue,x,y,z ){console .log (x,y,z)Vue .filter ('mySlice' ,function (value ){return value.slice (0 ,4 )Vue .directive ('fbind' ,{bind (element,binding ){value = binding.value inserted (element,binding ){focus ()update (element,binding ){value = binding.value Vue .mixin ({data (return {x :100 ,y :200 Vue .prototype hello = ()=> {alert ('你好啊' )}
使用:
1 2 import plugins from './plugins' Vue .use (plugins, 1 , 2 , 3 )
传参 父:
1 2 3 4 5 6 7 8 9 10 11 12 13 14 15 16 17 18 19 20 21 22 23 24 25 26 27 28 29 30 31 32 33 34 35 36 37 38 39 40 41 42 43 44 45 46 47 48 49 50 51 52 53 54 55 <template>
子:
1 2 3 4 5 6 7 8 9 10 11 12 13 14 15 16 17 18 19 20 21 22 23 24 25 26 27 28 29 30 31 32 33 34 35 36 37 38 39 40 41 <template>
$emit传参 自定义事件
父App.vue
1 2 3 4 5 6 7 8 9 10 11 12 13 14 15 16 17 18 19 20 21 22 23 24 25 26 27 <template>
子:aSchool.vue
1 2 3 4 5 6 7 8 9 10 11 12 13 14 15 16 17 18 19 20 21 22 23 24 25 26 27 28 29 30 31 32 <template>
总线 适用于任意组件之间通信
安装:
1 2 3 4 5 6 7 new Vue ({beforeCreate (Vue .prototype $bus =this
使用:
接收数据
1 2 3 4 5 6 7 methods (demo (data ){......}mounted (this .$bus .$on('xxx' , this .demo )
提供数据:this.$bus.$emit('xxx', 数据)
销毁:在beforeDestroy中用$off解绑当前组件所用到的事件
消息订阅与发布 使用pubsub-js库
任意组件之间调用函数
1 2 3 4 5 6 7 8 9 10 11 12 13 14 15 16 17 18 19 20 21 22 23 24 25 26 27 28 29 30 31 32 33 34 35 36 37 38 39 40 <template>
1 2 3 4 5 6 7 8 9 10 11 12 13 14 15 16 17 18 19 20 21 22 23 24 25 26 27 28 29 30 31 32 33 34 35 36 <template>
$nextTick
语法:this.$nextTick(回调函数)
作用:在下一次DOM更新结束后执行其指定的回调
什么时候用:当改变数据后,要基于更新后的新DOM进行某些操作时,要在nextTick所指定的回调函数中执行
1 2 3 this .$nextTick(function (this .$refs .inputT
动画 1 1 2 3 4 5 6 7 8 9 10 11 12 13 14 15 16 17 18 19 20 21 22 23 24 25 26 27 28 29 30 31 32 33 34 35 36 37 38 39 40 41 42 <template>
2 1 2 3 4 5 6 7 8 9 10 11 12 13 14 15 16 17 18 19 20 21 22 23 24 25 26 27 28 29 30 31 32 33 34 35 36 37 38 <template>
离开时触发:
v-leave, v-leave-active, v-leave-to
进入时触发:
v-enter, v-enter-active, v-enter-to
Vuex https://vuex.vuejs.org/zh/
基础 ./src/store/index.js
1 2 3 4 5 6 7 8 9 10 11 12 13 14 15 16 17 18 19 20 21 22 23 24 25 26 27 28 29 30 31 32 33 34 35 36 37 38 39 40 41 42 43 44 45 46 import Vue from "vue" ;import Vuex from "vuex" ;Vue .use (Vuex );const actions = {addOdd (context, value ) {console .log ("context: " , context);if (context.state .sum % 2 ) context.commit ("ADD" , value);addWait (context, value ) {setTimeout (() => {commit ("ADD" , value);500 );const mutations = {ADD (state, value ) {sum += value;SUBTRACT (state, value ) {sum -= value;const state = {sum : 0 ,const getters = {bigSum (state ) {return state.sum * 10 ;export default new Vuex .Store ({
./src/main.js
1 2 3 4 5 6 7 8 9 10 11 import Vue from 'vue' import App from './App.vue' Vue .config .productionTip = false import store from './store' ;new Vue ({render : h =>h (App ),'#app' )
./src/App.vue
1 2 3 4 5 6 7 8 9 10 11 12 13 14 15 16 17 18 19 20 21 22 23 <template>
./src/components/MyCount.vue
1 2 3 4 5 6 7 8 9 10 11 12 13 14 15 16 17 18 19 20 21 22 23 24 25 26 27 28 29 30 31 32 33 34 35 36 37 38 39 40 41 42 43 44 <template>
一个更轻松的写法,定义别名:
1 2 3 4 5 6 7 8 9 10 11 12 13 14 15 16 17 18 19 20 21 22 23 24 25 26 27 28 29 30 31 32 33 34 35 36 37 38 39 40 41 42 43 44 45 46 47 48 49 50 51 52 53 <template>
Mutations和Actions也可以映射:
1 2 3 4 5 6 7 8 9 10 11 12 13 14 15 16 17 18 19 20 21 22 23 24 25 26 27 28 29 30 31 32 33 34 35 36 37 38 39 40 41 42 43 44 45 46 47 48 49 50 51 52 53 54 55 <template>
蓝桥 引入:
1 2 3 4 5 6 7 8 9 10 11 12 13 14 15 16 17 18 19 20 21 <script src ="https://unpkg.com/vuex" > </script > <script > import Vuex from 'vuex' Vue .use (Vuex )const store = new Vuex .Store ({ state : {count : 0 }, }) new Vue ({ el :'#app' , render : h =>h (app), router, store }) </script >
在一个模块化的打包系统中,我们必须显式地通过 Vue.use() 来安装 Vuex:
1 2 3 4 import Vue from "vue" ;import Vuex from "vuex" ;Vue .use (Vuex );
Vuex 中有五个核心概念,它们分别是 State 、Getters 、Mutations 、Actions 和 Modules 。
首先,在 main.js 文件中写入以下代码:
1 2 3 4 5 6 7 8 9 10 11 12 13 14 15 16 17 18 import Vue from "vue" ;import App from "./App.vue" ;import Vuex from "vuex" ; Vue .use (Vuex ); Vue .config .productionTip = false ;const store = new Vuex .Store ({state : {count : 0 , new Vue ({render : (h ) => h (App ),"#app" );
有同学可能会问:为啥不叫 vuex 而是 store 呢?🤔
这是因为,Vuex 应用的核心就是 store(仓库)。它是一个用于存储组件共享状态(state)的容器,就像一个小型的数据仓库。它所有的功能和操作都是用于处理这个仓库中的状态而存在的,所以我们在创建 Vuex 配置的时候都是以 store 命名。
接下来,我们在 App.vue 中将计数器的状态展示出来,在文件中写入以下代码。
1 2 3 4 5 6 7 8 9 10 11 12 13 14 15 <template > <div id ="app" > {{count}}</div > </template > <script > export default { name : "App" , computed : { count ( return this .$store .state .count ; }, }, }; </script >
来这里我们就可以在页面上访问到 count 的数据了,当前页面会显示 0。
接下来,我们要实现点击按钮计数的功能,每点一次按钮数据 +1。
在 App.vue 文件中定义一个按钮,新增代码如下:
1 2 <button @click ="$store.commit('increment')" > ++</button >
我们在 main.js 文件中增加 mutations,代码如下:
1 2 3 4 5 6 7 8 const store = new Vuex .Store ({mutations : {increment (state ) {count ++;
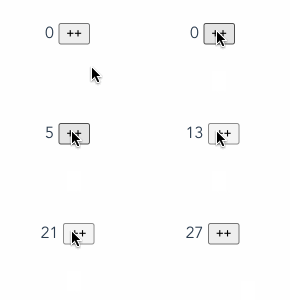
计数器的功能就实现啦~ 🎉 效果如下:
到此我们已经实现了一个最简单的 Vuex 状态管理,从上面的使用我们可以看出 state 就是用来存储和初始化状态。
通过上面简单的示例,我们知道了 Vuex 主要是用来存储并管理组件共享状态的。
有时候我们需要向后台发出一些异步请求,我们不能直接在 mutations 里进行操作,这时就可以在 actions 中定义一些异步操作。
下面我们来模拟一下异步操作,在页面上新增一个按钮,触发 count-- 的操作。在 App.vue 中新增以下代码:
1 <button @click ="$store.dispatch('decrement')" > --</button >
注意哦!!! Actions 是通过 store.dispatch 方法来触发 actions 更新 state 状态。
在 main.js 文件中新增以下内容。
1 2 3 4 5 6 7 8 9 10 11 12 13 14 15 const store = new Vuex .Store ({mutations : {decrement (state ) {count --;actions : {decrement ({ commit } ) {setTimeout (() => {commit ("decrement" );500 );
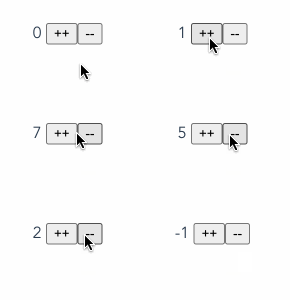
到这里我们 count-- 的功能也实现了,效果如下:
==actions 与 mutations 的区别==
actions 类似于 mutations,不同的是:
actions 中的更新函数最终仍是通过调用 mutations 中的函数来更新状态的,不能通过它直接变更状态。与 mutations 不同,actions 中可以包含任意异步操作。
关于 mutations、actions 等的用法还有其它形式,这些在官网上都有详细的 API,大家可以根据官网 API 对它们进行更多更深入的了解,这里就不再一一细说了。
getters 可以帮助我们缓存数据。
我们增加一个每次计数增加两倍的功能,在 main.js 中新增以下代码:
1 2 3 4 5 getters : {doubleCount (state ) {return state.count * 2
然后在页面上获取数据,在 App 文件中新增以下代码:
1 {{$store.getters.doubleCount}}
这样,当点击 ++ 按钮时,计数会以乘 2 的形式增加。效果如下:
Vuex官方文档
你不能直接改变 store 中的状态。改变 store 中的状态的唯一途径就是显式地提交 (commit) mutation
1 2 3 4 5 6 7 8 9 10 11 12 13 14 15 16 17 18 19 20 21 import { createApp } from 'vue' import { createStore } from 'vuex' const store = createStore ({return {count : 0 mutations : {count ++const app = createApp ({ })use (store)
现在,你可以通过 store.state 来获取状态对象,并通过 store.commit 方法触发状态变更:
1 2 3 store.commit ('increment' )console .log (store.state .count )
在 Vue 组件中, 可以通过 this.$store 访问store实例。现在我们可以从组件的方法提交一个变更:
1 2 3 4 5 6 methods : {increment (this .$store .commit ('increment' )console .log (this .$store .state .count )
组件之间共享数据的方式
父向子传值:v-bind属性绑定
子向父传值:v-on事件绑定
兄弟组件之间共享数据:EventBus
$on接收数据的那个组件$emit发送数据的按个组件
State State提供唯一的数据源,所有的共享数据都要放到state中
1 2 3 const store = new Vuex .Store ({state : {count : 0 ,},
组件访问state中数据:
this.$store.state.全局数据名称 template实例中可以省掉this
路由 基础 ./src/router/index.js
1 2 3 4 5 6 7 8 9 10 11 12 13 14 15 16 17 18 19 20 21 22 23 24 25 26 27 28 29 30 31 32 import VueRouter from "vue-router" ;import MyAbout from "../pages/MyAbout" ;import MyHome from "../pages/MyHome" ;import MyNews from "../pages/MyNews.vue" ;import MyMessage from "../pages/MyMessage.vue" ;export default new VueRouter ({routes : [bane :'guanyu' path : "/about" ,component : MyAbout ,path : "/home" ,component : MyHome ,children : [path : "news" ,component : MyNews ,path : "message" ,component : MyMessage ,
./src/main.js
1 2 3 4 5 6 7 8 9 10 11 12 import Vue from 'vue' import App from './App.vue' import router from "./router" ;import VueRouter from 'vue-router' ;Vue .config .productionTip = false Vue .use (VueRouter )new Vue ({render : (h ) => h (App ),router : router,"#app" );
./src/pages/Myhome.vue
1 2 3 4 5 6 7 8 9 10 11 12 13 14 15 16 17 18 19 20 21 22 23 24 25 26 27 <template>
query参数 发送:
1 2 3 4 5 6 7 <router-link :to ="{ path:'/home/message/detail', query:{ id:m.id, title:m.title } }" ></router-link >
接收:
1 2 3 4 5 6 7 8 9 10 11 12 13 14 15 <template>
params参数 router/index.js
1 2 3 4 5 {name : "xiangxi" ,path : "detail/:id/:title" ,component : MyDetail ,
使用:
1 2 3 4 5 6 7 8 <router-link :to ="{ // path:'/home/message/detail', name: 'xiangxi', params: { id: m.id, title: m.title } }" ></router-link >
读取:
{{ $route.params.id }}
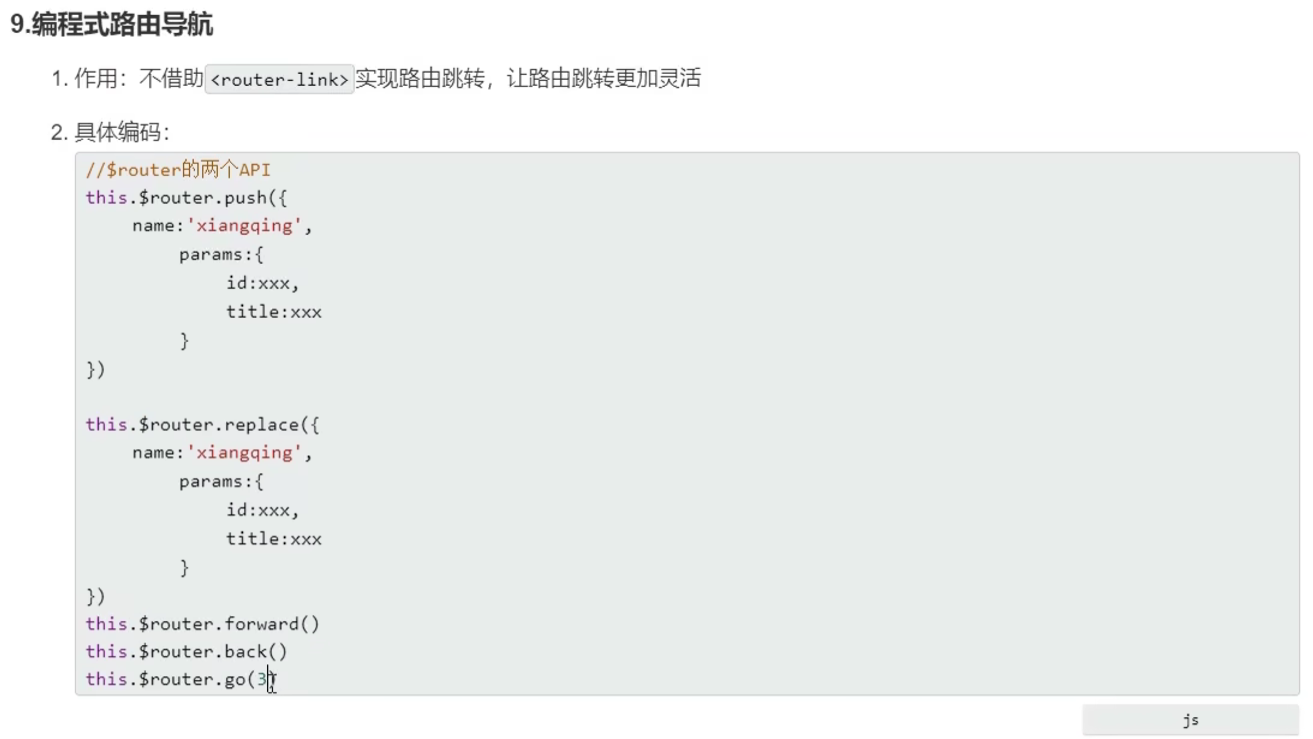
this.$router.push(path): 相当于点击路由链接(可以返回到当前路由界面)
this.$router.replace(path): 用新路由替换当前路由(不可以返回到当前路由界面)
this.$router.back(): 请求(返回)上一个记录路由
this.$router.go(-1): 请求(返回)上一个记录路由
this.$router.go(1): 请求下一个记录路由
缓存: keep-alive 1 2 3 <keep-alive :include ="['MyNews', 'MyMessage']" > <router-view > </router-view > </keep-alive >
新的生命周期:
1 2 3 4 5 6 7 8 9 10 11 12 activated (console .log ('News组件被激活了' )this .timer = setInterval (() => {console .log ('@' )this .opacity -= 0.01 if (this .opacity <= 0 ) this .opacity = 1 16 )deactivated (console .log ('News组件失活了' )clearInterval (this .timer )
路由守卫 对路由进行权限控制
全局守卫 1 2 3 4 5 6 7 8 9 10 11 12 13 14 15 16 17 18 19 20 21 22 23 beforeEach ((to,from ,next ) => {console .log ('beforeEach' ,to,from )if (to.meta .isAuth ){ if (localStorage .getItem ('school' ) === 'atguigu' ){ next () else {alert ('暂无权限查看' )else {next () afterEach ((to,from ) => {console .log ('afterEach' ,to,from )if (to.meta .title ){ document .title = to.meta .title else {document .title = 'vue_test'
独享守卫 1 2 3 4 5 6 7 8 beforeEnter (to,from ,next ){console .log ('beforeEnter' ,to,from )if (localStorage .getItem ('school' ) === 'atguigu' ){next ()else {alert ('暂无权限查看' )
组件内守卫 1 2 3 4 5 from , next) {... next ()},from , next) {... next ()},
蓝桥 引入:
1 https://unpkg.com/vue-router@2.0.0/dist/vue-router.js
我们通过一个单页面应用来看看 Vue-Router 的使用,其基本步骤如下所示:
使用 router-link 组件来导航,其通过 to 属性来指定跳转链接(这相当于 HTML 中的 a 标签)。
使用 router-view 组件定义路由出口,路由匹配到的组件将会渲染到此处。
使用 const routes = [{ path, component }] 来定义路由(路径和组件名)。
使用 const router = new VueRouter({}) 来创建路由实例,在其中传入上一步定义的路由配置 routes。
创建和挂载根实例,在 new Vue 中挂载上一步创建的路由实例 router。
步骤清楚了,我们来举个例子吧~
使用以下命令获取 Vue 和 Vue-Router 文件。
1 wget https://labfile.oss.aliyuncs.com/courses/10532/vue-router.js
新建一个 index.html 文件,在文件中写入以下内容:
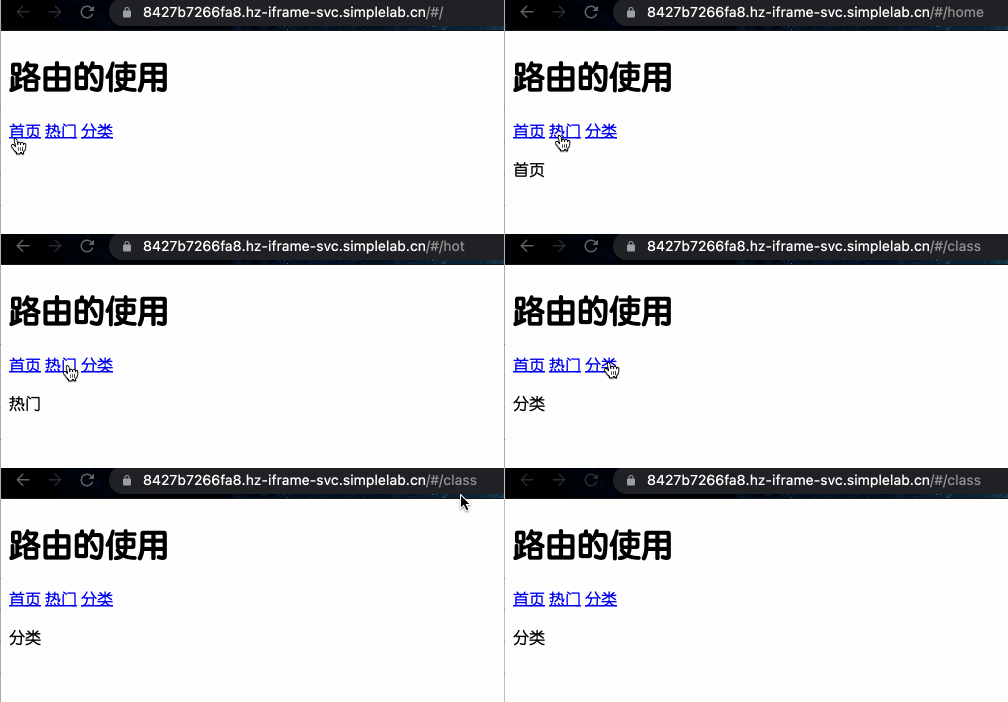
1 2 3 4 5 6 7 8 9 10 11 12 13 14 15 16 17 18 19 20 21 22 23 24 25 26 27 28 29 30 31 32 33 34 35 36 37 38 39 40 41 42 43 44 45 46 47 48 <!DOCTYPE html > <html lang ="en" > <head > <meta charset ="UTF-8" /> <meta http-equiv ="X-UA-Compatible" content ="IE=edge" /> <meta name ="viewport" content ="width=device-width, initial-scale=1.0" /> <title > Document</title > <script src ="vue.min.js" > </script > <script src ="vue-router.js" > </script > </head > <body > <div id ="app" > <h1 > 路由的使用</h1 > <p > <router-link to ="/home" > 首页</router-link > <router-link to ="/hot" > 热门</router-link > <router-link to ="/class" > 分类</router-link > </p > <router-view > </router-view > </div > <script > const Home = { template : "<div>首页</div>" }; const Hot = { template : "<div>热门</div>" }; const Class = { template : "<div>分类</div>" }; const routes = [ { path : "/home" , component : Home }, { path : "/hot" , component : Hot }, { path : "/class" , component : Class }, ]; const router = new VueRouter ({ routes, }); const app = new Vue ({ router, }).$mount("#app" ); </script > </body > </html >
效果如下所示:
axios 1 2 3 4 5 6 7 8 9 10 11 12 13 14 15 16 17 18 const { defineConfig } = require ("@vue/cli-service" );module .exports = defineConfig ({transpileDependencies : true ,devServer : {proxy : {"/api" : {target : "http://localhost:5000" , pathRewrite : { '^/api' : '' }, ws : true ,changeOrigin : true ,
1 2 3 4 5 6 7 8 9 10 11 12 13 14 15 16 17 18 19 20 21 22 23 24 25 26 <!-- App.vue -->
1 2 3 4 <script src ="https://unpkg.com/axios/dist/axios.min.js" > </script >
1 2 3 4 5 6 7 8 9 10 11 12 13 14 15 16 17 18 19 20 21 22 23 24 25 26 <div id ="app" > <input type ="button" value ="获取笑话" @click ="getJoke" > <p > {{joke}} </p > </div > <script src ="https://unpkg.com/axios/dist/axios.min.js" > </script > <script src ="https://cdn.jsdelivr.net/npm/vue/dist/vue.js" > </script > <script > let app=new Vue ({ el : '#app' , data :{ joke : "很好笑的笑话" , }, methods :{ getJoke : function ( let that=this ; axios.get ("https://autumnfish.cn/api/joke" ).then ( function (response ){ console .log (response.data ); that.joke = response.data ; } ) } } }) </script >
通用:
1 2 3 4 5 6 7 8 9 10 11 12 13 14 15 16 17 18 19 axios ({method : "get" ,url : "xxx" ,cache : false ,params : {id : 123 ,headers : "xxx" ,axios ({method : "post" ,url : "xxx" ,data : {firstName : "Tom" ,lastName : "Sun" ,
其中需要注意的是,get 和 post 请求中向后端传递参数的配置项名字不同:get 请求的需要使用 params,post 请求用于发送数据的为 data。
Vue3 小满zs 数组更新检测 一些操作数组的方法,编译会检测,从而会促使视图更新。
push()pop()shift() 删除并返回第一个unshift() 向开头添加多个元素,返回新长度splice() 删除 / 删除并添加sort()reverse()
上面这些数组操作方法,会直接改变原始数组称为变异方法,会促使视图自动更新。
学了 JavaScript 标准对象库,都知道有些数组方法是不直接改变原数组的,这里称它们为非变异方法,例如:filter()、slice()、concat(),它们都是返回一个新数组,那么,在 Vue 中使用到这些方法,怎么样才能促使视图更新呢?我们就必须使用数组替换法,将非变异方法返回的新数组直接赋值给的旧数组。
1 this .nav = this .nav .slice (1 , 4 );
由于 JavaScript 的限制,Vue 不能检测以下变动的数组:
当你利用索引直接设置一个项时,例如:vm.items[indexOfItem] = newValue。
当你修改数组的长度时,例如:vm.items.length = newLength。
例子:
1 2 3 4 5 6 7 var app = new Vue ({data : {items : ["a" , "b" , "c" ],items [1 ] = "x" ; items .length = 2 ;
上去直接这样改值操作是没有问题的,但是不是响应式的,并不能触发视图更新,需要用其他方法代替。
例如这样的操作 app.items[indexOfItem] = newValue ,可以用以下两种代替。
1 2 3 4 Vue .set (vm.items , indexOfItem, newValue);items .splice (indexOfItem, 1 , newValue);
1 2 3 4 5 6 7 8 9 10 11 12 13 14 15 16 17 18 19 // 不加括号<span v-for ="number in oddNumber" > {{number}}</span > <span v-for ="number in getOddNumber()" > {{number}}</span >
表单处理 https://cn.vuejs.org/examples/#form-bindings
v-module
只适用于input标签
便捷地设置和获取表单元素的值
绑定的数据会和表单元素值相关联
绑定的数据 <–> 表单元素的值:双向绑定
1 2 3 4 5 6 7 8 9 10 11 <div id="app" >import {ref} from 'vue' "text" v-model="message" />let app=new Vue ({el : '#app' ,data : {message : "黑馬程序員"
常用表单元素
元素
input[type=*]
文本输入框
textarea
多行文本
radio
单选按钮
checkbox
复选框
select
选择框
==注意==
注意一 :v-model 会忽略所有表单元素的 value、checked、selected 特性的初始值而总是将 Vue 实例的数据作为数据来源。直接给元素 value 赋值不会生效的,你应该通过 JavaScript 在组件的 data 选项中声明初始值。
注意二 :v-model 在内部使用不同的属性为不同的输入元素并抛出不同的事件,具体体现我们在表单 修饰符小节 ,给大家说明:
text 和 textarea 元素使用 value 属性和 input 事件(内部监听 input 事件);
checkbox 和 radio 使用 checked 属性和 change 事件(内部监听 change 事件);
select 字段将 value 作为 prop 并将 change 作为事件(内部监听 change 事件)。
说明: change 和 input 区别就是,input 实时更新数据,change 不是实时更新
单选按钮 将单选按钮绑定到同一个 picked,即可完成数据绑定
当第一个单选被选中 picked 的值为第一个单选按钮的 value,
同样当第二个单选被选中 picked 的值为第二个单选按钮的 value。
1 2 3 4 5 6 7 8 9 10 11 12 13 14 15 16 17 18 19 20 21 22 <body > <div id ="app" > <input type ="radio" id ="one" value ="One" v-model ="picked" /> <label for ="one" > One</label > <br /> <input type ="radio" id ="two" value ="Two" v-model ="picked" /> <label for ="two" > Two</label > <br /> <span > Picked: {{ picked }}</span > </div > <script > var vue = new Vue ({ el : "#app" , data ( return { picked : "" , }; }, }); </script > </body >
复选框 复选框绑定的是一个布尔值(true or false),同样在复选框元素上使用 v-model 指令,在实例 data 中声明 checked,即可完成复选框数据的双向绑定。
1 2 3 4 5 6 7 8 9 10 11 12 13 14 15 <body > <div id ="app" > <input type ="checkbox" id ="checkbox" v-model ="checked" /> <label for ="checkbox" > {{ checked }}</label > </div > <script > var vue = new Vue ({ el : "#app" , data :{ checked : false , }, }); </script > </body >
v-module='check'表示
当选中时,把check = value绑定
如果不存在value,则check为布尔值
修饰符 ==lazy==
开始介绍表单处理时,我们说了几点注意,不同的元素,使用的值不同,抛出的事件也不同。
可能开发中,我们不需要数据实时更新,那么,我们怎么将 input 事件与 change 事件替换,
可以使用 .lazy 修饰符,可以将抛出事件由 input 改为 change,使表单元素惰性更新,不实时更新。
1 2 3 4 5 6 7 8 9 10 11 12 13 14 15 <body > <div id ="app" > <input v-model.lazy ="msg" /> <p > {{msg}}</p > </div > <script > var vue = new Vue ({ el : "#app" , data : { msg : "hello" , }, }); </script > </body >
只有文本框失去焦点才更新数据
==number==
自动将用户的输入值转为数值类型
即使在 type="number" 时,HTML 输入元素的值也会返回字符串(默认)
==trim==
过滤首尾空格
响应式修改
Ref全家桶 ref 1 2 3 4 5 6 7 8 9 <script lang='ts'>
以前,只有age:18这样的才是响应式对象
1 2 3 4 5 6 7 8 9 10 11 12 13 14 15 16 17 18 19 20 21 <template>
可以这样
isRef isRef(Man):判断一个对象是不是ref对象
isRef: 检查一个值是否为一个 ref 对象
isReactive: 检查一个对象是否是由 reactive 创建的响应式代理
isReadonly: 检查一个对象是否是由 readonly 创建的只读代理
isProxy: 检查一个对象是否是由 reactive 或者 readonly 方法创建的代理
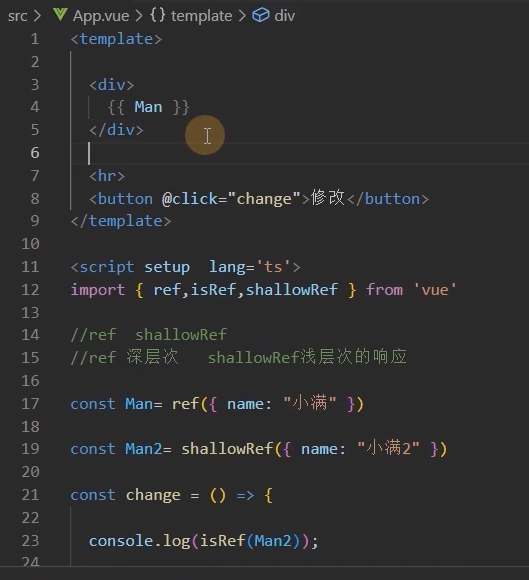
shallowRef 1 2 3 4 5 6 7 8 9 10 11 <script setup lang='ts'>
shallowRef是浅层的响应式,属性需要直接挂载到Man.value上,它的响应式只到.value上
(内部会更新,但不会响应式地渲染到页面上)
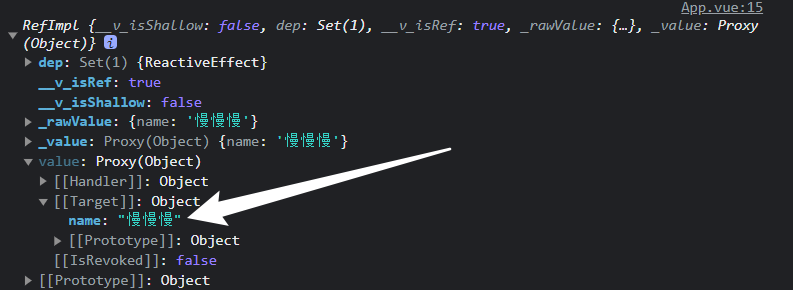
注意: ref和shallowRef不可以混写,否则会影响shallowRef,造成视图的更新
1 2 3 4 5 6 7 8 9 10 11 12 <script setup lang='ts'>
triggerRef 1 2 3 4 5 6 7 8 9 10 <script setup lang='ts'>
triggerRef会强制更新shallowRef对象
customRef
1 2 3 4 5 6 7 8 9 10 11 12 13 14 15 16 17 18 19 20 21 22 23 24 25 26 27 28 <script setup lang='ts'>
其他 ref可以获取dom属性
1 2 3 4 5 6 7 8 9 10 11 12 13 14 15 16 17 18 19 <template>
ref='name'和name=ref()的name要求一致
reactive全家桶 reactive
ref支持所有类型,reactive只支持引用类型ref取值赋值都需要通过.value,reactive不需要
1 2 3 4 5 6 7 8 9 10 11 12 13 14 15 16 17 18 19 20 21 22 23 24 25 <template><div > <form > <ul > <li v-for ="item in list" > {{ item }}</li > </ul > <button @click.prevent ="add" > 添加</button > </form > </div > <script setup lang ='ts' > import {reactive} from 'vue' let list = reactive<string[]>([])const add = ( setTimeout (() => { let res = ["EDG" , 'REW' ]; list = res; console .log (list); }, 2000 ) ] </script > <style scoped > </style >
这样并不能把res的内容渲染到list里面。因为list是reactive proxy值,不能直接复制,否则会破坏响应式对象
但是可以push:
readonly 1 2 3 4 5 6 <script setup lang='ts'>
这样可以改变readonly对象的属性
1 2 3 4 5 6 7 8 9 10 11 <script setup lang='ts'>
shallowReactive 浅层的Reactive:
1 2 3 4 5 6 7 8 9 10 11 12 13 14 15 16 17 18 19 20 21 22 23 24 25 <template>
shallowReactive也会被Reactive修改
to系列全家桶 toRef 1 2 3 4 5 6 7 8 9 10 11 12 13 14 15 16 17 18 19 <template>
这样只能修改值,修改不了视图,不是响应式的
1 2 3 4 5 6 7 8 9 <script setup lang='ts'>
这样也不行,因为toRef只能用给响应式对象:
这样是正确的
1 2 3 4 5 6 7 8 9 <script setup lang='ts'>
toRefs 对每个属性都调用一遍toRef
手动实现:
1 2 3 4 5 6 7 const toRefs = <T extends object>(object: T) => {
toRaw 脱去代理
1 console .log (obj, toRaw (obj));
计算属性 计算属性就是当依赖的属性的值发生变化的时候,才会触发他的更改,如果依赖的值,不发生变化的时候,使用的是缓存中的属性值。
函数形式(常用,只设置setter)
1 2 3 4 5 6 7 8 import { computed, reactive, ref } from 'vue' let price = ref (0 )let m = computed<string>(()=> {return `$` + price.value value = 500
对象形式
1 2 3 4 5 6 7 8 9 10 11 12 13 14 15 16 17 18 19 20 <template>
侦听属性 watch watch 需要侦听特定的数据源,并在单独的回调函数中执行副作用
watch第一个参数监听源
watch第二个参数回调函数cb(newVal,oldVal)
watch第三个参数一个options配置项是一个对象:
1 2 3 4 {immediate :true deep :true
实例:
监听一个 1 2 3 4 5 6 7 8 9 10 11 12 13 14 15 16 17 import { ref, watch } from 'vue' let message = ref ({nav :{bar :{name :"" watch (message, (newVal, oldVal ) => {console .log ('新的值----' , newVal);console .log ('旧的值----' , oldVal);immediate :true ,deep :true
监听多个: 1 2 3 4 5 6 7 8 9 import { ref, watch ,reactive} from 'vue' let message = ref ('' )let message2 = ref ('' )watch ([message,message2], (newVal, oldVal ) => {console .log ('新的值----' , newVal);console .log ('旧的值----' , oldVal);
监听Reactive 使用reactive监听深层对象开启和不开启deep 效果一样
1 2 3 4 5 6 7 8 9 10 11 12 13 import { ref, watch ,reactive} from 'vue' let message = reactive ({nav :{bar :{name :"" watch (message, (newVal, oldVal ) => {console .log ('新的值----' , newVal);console .log ('旧的值----' , oldVal);
只监听reactive的一个值 需要是一个函数的返回值
1 2 3 4 5 6 7 8 9 10 import { ref, watch ,reactive} from 'vue' let message = reactive ({name :"" ,name2 :"" watch (()=> message.name , (newVal, oldVal ) => {console .log ('新的值----' , newVal);console .log ('旧的值----' , oldVal);
watchEffect 详见:小满vue-watchEffect
(页面加载的时候会立即执行一次)
立即执行传入的一个函数,同时响应式追踪其依赖,并在其依赖变更时重新运行该函数。
如果用到message 就只会监听message 就是用到几个监听几个 而且是非惰性 会默认调用一次
1 2 3 4 5 6 let message = ref<string>('' )let message2 = ref<string>('' )watchEffect (() => {console .log ('message2' , message2.value );
组件&生命周期 引入:
1 import A form './components/aaa.vue'
A可以为任意名称
使用:
1 2 3 4 <template>
生命周期:
在setup语法糖模式下,没有before、created这两个生命周期,可以用setup代替
onBeforeMount()
onMounted()v-if会触发这两个,但v-show不会
onBeforeUpdate()
onUpdated()
onBeforeUnmount()
onUnmounted()
实操组件和认识less sass 和 scoped bem架构:
他是一种css架构 oocss 实现的一种 (面向对象css) , BEM实际上是block、element、modifier的缩写,分别为块层、元素层、修饰符层,element UI 也使用的是这种架构
BEM 命名约定的模式是:
1 2 3 4 5 .block {}.block__element {}.block--modifier {}
使用sass 最小单元复刻一个bem 架构(写在./src/bem.scss中):
1 2 3 4 5 6 7 8 9 10 11 12 13 14 15 16 17 18 19 20 21 22 23 24 25 26 27 28 29 30 31 32 33 34 35 36 37 38 $block-sel : "-" !default;$element-sel : "__" !default;$modifier-sel : "--" !default;$namespace :'xm' !default;@mixin bfc {height : 100% ;overflow : hidden;@mixin b($block ) {$B : $namespace + $block-sel + $block ; $B }{ @content ; @mixin flex {display : flex;@mixin e($element ) {$selector :&;@at-root {$selector + $element-sel + $element } {@content ;@mixin m($modifier ) {$selector :&;@at-root {$selector + $modifier-sel + $modifier } {@content ;
全局扩充scss,(在./vite/config.ts文件中):
1 2 3 4 5 6 7 8 9 10 11 12 13 14 import { defineConfig } from 'vite' import vue from '@vitejs/plugin-vue' export default defineConfig ({plugins : [vue ()],css : {preprocessorOptions : {scss : {additionalData : "@import './src/bem.scss';"
父子组件传参 父传子 父组件发送:
直接使用v-bind:
1 2 3 4 5 6 7 8 9 10 <template>
子组件接收:
1 2 3 4 5 6 7 8 9 10 11 12 13 14 15 16 17 18 <template>
可以在template中直接使用,但在script中使用时,要加上props.
使用ts写法:
1 2 3 4 5 6 7 import { ref, reactive } from 'vue' ;withDefaults (defineProps<{title : string,arr :number[]arr : ()=> [666 ]
子传父 子:
1 2 3 4 5 6 7 8 9 10 11 12 13 14 15 16 17 <template>
使用ts:
1 2 3 4 5 6 const emit = defineEmits<{e :'on-click' , name :string):void const send = (emit ('on-click' , '小满' )
父:
1 2 3 4 5 6 7 8 9 10 11 12 13 14 15 <template>
子组件变量暴露给父组件 父组件:
1 2 3 4 5 6 7 8 9 10 11 12 13 14 15 <template>
子组件:
1 2 3 4 5 6 7 8 9 10 11 12 13 14 15 16 17 18 <template>
全局组件,局部组件,递归组件 小满
注册全局组件: 1 2 3 4 5 6 7 8 9 import { createApp } from 'vue' import './style.css' import App from './App.vue' import waterFull from "./components/water-fall.vue" ;export const app = createApp (App );component ('water-full' ,waterFull);mount ('#app' );
注册完毕后,可以在其他地方使用,无需引入
递归组件 1 2 3 4 5 6 <template>
Tree可以是当前文件名
动态组件 1 2 3 4 5 6 7 8 9 10 11 12 13 14 15 16 17 18 19 20 21 22 23 24 25 26 27 28 29 30 31 32 33 34 35 36 37 38 39 40 <template>
性能优化
1 2 3 4 5 6 7 const tab = reactive<Com []>([{name : "A组件" ,comName : markRaw (A)name : "B组件" ,comName : markRaw (B)
插槽slot 匿名插槽 在子组件放置一个插槽
1 2 3 4 5 <template>
父组件使用插槽
在父组件给这个插槽填充内容
1 2 3 4 5 <Dialog>
具名插槽 具名插槽其实就是给插槽取个名字。一个子组件可以放多个插槽,而且可以放在不同的地方,而父组件填充内容时,可以根据这个名字把内容填充到对应插槽中
1 2 3 4 5 6 <div>
父组件使用需对应名称
1 2 3 4 5 6 7 8 9 10 11 12 13 <Dialog>
作用域插槽 在子组件动态绑定参数 派发给父组件的slot去使用
1 2 3 4 5 6 7 8 9 10 <div>
通过解构方式取值
(v-slot有对应的简写: #)
1 2 3 4 5 6 7 8 9 10 11 <Dialog>
简写:
1 2 3 4 5 6 7 8 9 10 11 <Dialog>
动态插槽 插槽可以是一个变量名
1 2 3 4 5 6 7 8 9 10 11 <template>
内置组件 Teleport传送组件 [小满(https://xiaoman.blog.csdn.net/article/details/122916261 )
Teleport 是一种能够将我们的模板渲染至指定DOM节点,不受父级style、v-show等属性影响,但data、prop数据依旧能够共用的技术;类似于 React 的 Portal。
主要解决的问题 因为Teleport节点挂载在其他指定的DOM节点下,完全不受父级style样式影响使用方法
通过to 属性 插入指定元素位置 to=”body” 便可以将Teleport 内容传送到指定位置
也可以自定义传送位置 支持 class id等 选择器
keep-alive缓存组件 1 <keep-alive :include="['A', 'B']" :exclude="['C', 'D']" :max=""></keep-alive>
include:要缓存的组件exclude:不缓存的组件max:缓存组件的最大数量,LRU算法
生命周期
1 2 3 4 5 6 7 8 9 10 11 12 onMounted (() => {console .log ('初始化' ); onActivated (() => {console .log ('keep-alive初始化' ); onDeactivated (() => {console .log ('keep-alive卸载' ); onUnmounted (() => {console .log ('卸载' );
transition 过渡组件 Vue 提供了 transition 的封装组件,在下列情形中,可以给任何元素和组件添加进入/离开过渡:
条件渲染 (使用 v-if)
条件展示 (使用 v-show)
动态组件
组件根节点
自定义 transition 过度效果,你需要对transition组件的name属性自定义。并在css中写入对应的样式
在进入/离开的过渡中,会有 6 个 class 切换,下面的v代表template中name的值
v-enter-from:定义进入过渡的开始状态。在元素被插入之前生效,在元素被插入之后的下一帧移除。
v-enter-active:定义进入过渡生效时的状态。在整个进入过渡的阶段中应用,在元素被插入之前生效,在过渡/动画完成之后移除。这个类可以被用来定义进入过渡的过程时间,延迟和曲线函数。
v-enter-to:定义进入过渡的结束状态。在元素被插入之后下一帧生效 (与此同时 v-enter-from 被移除),在过渡/动画完成之后移除。
v-leave-from:定义离开过渡的开始状态。在离开过渡被触发时立刻生效,下一帧被移除。
v-leave-active:定义离开过渡生效时的状态。在整个离开过渡的阶段中应用,在离开过渡被触发时立刻生效,在过渡/动画完成之后移除。这个类可以被用来定义离开过渡的过程时间,延迟和曲线函数。
v-leave-to:离开过渡的结束状态。在离开过渡被触发之后下一帧生效 (与此同时 v-leave-from 被移除),在过渡/动画完成之后移除。
示例:
1 2 3 4 5 6 7 8 9 10 11 12 13 14 15 16 17 18 19 20 21 22 23 24 25 26 27 28 29 30 31 32 //开始过度.fade-enter-from {background :red;width :0px ;height :0px ;transform :rotate (360deg ).fade-enter-active {transition : all 2.5s linear;.fade-enter-to {background :yellow;width :200px ;height :200px ;.fade-leave-from {width :200px ;height :200px ;transform :rotate (360deg ).fade-leave-active {transition : all 1s linear;.fade-leave-to {width :0px ;height :0px ;
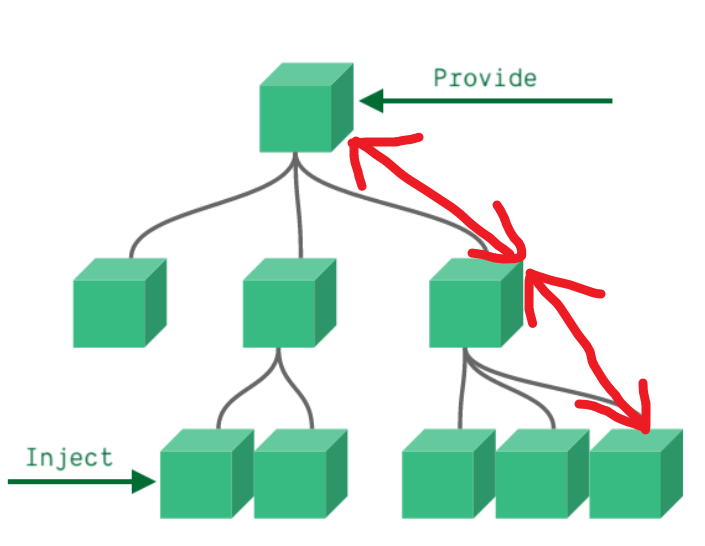
依赖注入Provide / Inject 注册一个变量,可以全局使用
1 2 3 4 5 6 7 8 9 10 11 12 13 14 15 16 17 18 19 20 21 22 23 24 25 26 27 28 29 30 31 32 <template>
1 2 3 4 5 6 7 8 9 10 11 12 13 14 15 16 17 18 19 20 <template>
1 2 3 4 5 6 7 8 9 10 11 12 13 14 15 16 17 18 19 20 21 22 <template>
兄弟组件传参和bus 借助父组件 1 2 3 4 5 6 7 8 9 10 11 12 13 14 15 16 17 18 19 <template>
A 组件派发事件通过App.vue 接受A组件派发的事件然后在Props 传给B组件 也是可以实现的
缺点就是比较麻烦 ,无法直接通信,只能充当桥梁
Event Bus 我们在Vue2可以使用 $emit 传递 $on监听 emit传递过来的事件
这个原理其实是运用了JS设计模式之发布订阅模式
我写了一个简易版
1 2 3 4 5 6 7 8 9 10 11 12 13 14 15 16 17 18 19 20 21 22 23 24 25 26 27 type BusClass <T> = {emit : (name: T ) => void on : (name: T, callback: Function ) => void type BusParams = string | number | symbol type List = {key : BusParams ]: Array <Function >class Bus <T extends BusParams > implements BusClass <T> {list : List constructor (this .list = {}emit (name: T, ...args: Array <any > ) {let eventName : Array <Function > = this .list [name]forEach (ev =>apply (this , args)on (name: T, callback: Function ) {let fn : Array <Function > = this .list [name] || [];push (callback)this .list [name] = fnexport default new Bus <number >()
mitt库 https://xiaoman.blog.csdn.net/article/details/125453908
安装
main.ts 初始化
1 2 3 4 5 6 7 8 9 10 11 12 13 14 15 16 17 18 19 20 import { createApp } from 'vue' import App from './App.vue' import mitt from 'mitt' const Mit = mitt ()declare module "vue" {export interface ComponentCustomProperties {$Bus : typeof Mit const app = createApp (App )config .globalProperties .$Bus = Mit mount ('#app' )
TSX https://xiaoman.blog.csdn.net/article/details/123172735
JSX本身是一种JavaScript的语法扩展,用于在JavaScript代码中编写类似于HTML的结构。它通常与React一起使用,用于构建用户界面。
TSX是指”TypeScript JSX”,是一种使用TypeScript编写的JavaScript的扩展语法。
vite.config.ts配置:
1 2 3 4 5 6 7 8 9 10 11 12 13 14 import { defineConfig } from 'vite' import vue from '@vitejs/plugin-vue' import vueJsx from '@vitejs/plugin-vue-jsx' export default defineConfig ({plugins : [vue (), vueJsx ()],css : {preprocessorOptions : {scss : {additionalData : "@import './src/bem.scss';"
App.vue:
1 2 3 4 5 6 7 8 9 10 11 12 13 <template>
App.tsx第一种写法:
1 2 3 4 export default function (return (<div > 小满</div >
另一种:
1 2 3 4 5 6 7 8 9 10 11 12 import { defineComponent } from "vue" export default defineComponent ({data (return {age : 23 render (return (<div > { this.age }</div >
第三种:
1 2 3 4 5 6 7 8 9 import { defineComponent } from "vue" export default defineComponent ({setup (return () => <div > hello</div >
TIPS tsx不会自动解包,使用ref也要加.vlaue ! ! !
directive自定义指令 样例简介 1 2 3 4 5 6 7 8 9 10 11 12 13 14 15 16 17 18 19 20 21 22 23 24 25 26 27 28 29 30 31 32 33 34 35 36 37 38 39 40 41 42 43 44 45 46 <template>
A.vue
1 2 3 4 5 6 7 8 9 10 11 12 13 14 15 <template>
输出:
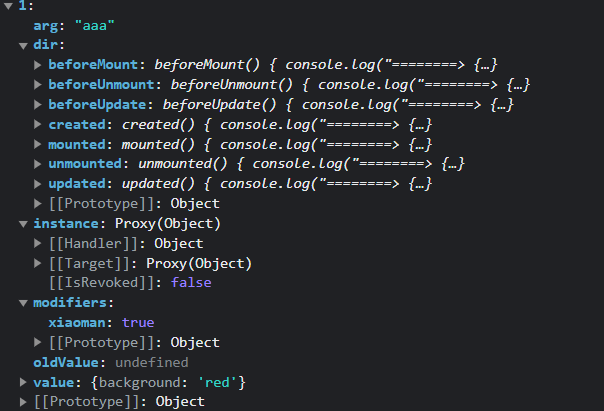
div.AAA是子组件的选择器el,类型:HTMLElement
类型:DirectiveBinding,传过来的参数:
instance:使用指令的组件实例。
value:传递给指令的值。例如,在 v-my-directive=”1 + 1” 中,该值为 2。
oldValue:先前的值,仅在 beforeUpdate 和 updated 中可用。无论值是否有更改都可用。
arg:传递给指令的参数(如果有的话)。例如在 v-my-directive:foo 中,arg 为 “foo”。
modifiers:包含修饰符(如果有的话) 的对象。例如在 v-my-directive.foo.bar 中,修饰符对象为 {foo: true,bar: true}。
dir:一个对象,在注册指令时作为参数传递。例如,在以下指令中
当前组件的v-node,虚拟dom
prevode,上一个虚拟dom
函数简写 可能想在 mounted 和 updated 时触发相同行为,而不关心其他的钩子函数。那么你可以通过将这个函数模式实现
1 2 3 4 5 6 7 8 9 10 11 12 13 14 15 16 17 18 19 20 21 22 23 24 25 26 27 28 29 30 31 32 33 34 35 36 37 38 <template>
图片懒加载 1 2 3 4 5 6 7 8 9 10 11 12 13 14 15 16 17 18 19 20 21 22 23 24 25 26 27 28 29 30 31 32 <template>
自定义attrs / hooks https://xiaoman.blog.csdn.net/article/details/123271189
主要用来处理复用代码逻辑的一些封装
这个在vue2 就已经有一个东西是Mixins
mixins就是将这些多个相同的逻辑抽离出来,各个组件只需要引入mixins,就能实现一次写代码,多组件受益的效果。
弊端就是 会涉及到覆盖的问题
组件的data、methods、filters会覆盖mixins里的同名data、methods、filters。
自定义attrs 1 2 3 4 5 6 7 8 9 10 11 12 <template>
1 2 3 4 5 6 7 8 9 10 11 12 13 <template>
自定义hooks 图片转base64
1 2 3 4 5 6 7 8 9 10 11 12 13 14 15 16 17 18 19 20 21 22 23 24 25 26 27 28 29 30 31 32 import { onMounted } from 'vue' type Options = {el : string type Return = {Baseurl : string | null export default function (option: Options ): Promise <Return > {return new Promise ((resolve ) => {onMounted (() => {const file : HTMLImageElement = document .querySelector (option.el ) as HTMLImageElement ;onload = ():void =>resolve ({Baseurl : toBase64 (file)const toBase64 = (el : HTMLImageElement ): string =>const canvas : HTMLCanvasElement = document .createElement ('canvas' )const ctx = canvas.getContext ('2d' ) as CanvasRenderingContext2D width = el.width height = el.height drawImage (el, 0 , 0 , canvas.width ,canvas.height )console .log (el.width );return canvas.toDataURL ('image/png' )
全局函数和变量 App.vue
1 2 3 4 5 6 7 8 9 10 11 12 13 14 15 <template>
main.ts
1 2 3 4 5 6 7 8 9 10 11 12 import { createApp } from 'vue' import App from './App.vue' export const app = createApp (App )config .globalProperties .$env = 'dev' ;config .globalProperties .$filters = {str : T) {return `小满-${str} ` mount ('#app' )
消除报错版 1 2 3 4 5 6 7 8 9 10 11 12 13 14 15 16 17 18 19 20 21 22 23 24 25 26 import { createApp } from 'vue' import App from './App.vue' export const app = createApp (App )config .globalProperties .$env = 'dev' ;config .globalProperties .$filters = {str : T) {return `小满-${str} ` type Filter = {str : T): string declare module 'vue' {export interface ComponentCustomProperties {$filters : Filter ,$env : string mount ('#app' )
新的组件 1.Fragment
在Vue2中: 组件必须有一个根标签
在Vue3中: 组件可以没有根标签, 内部会将多个标签包含在一个Fragment虚拟元素中
好处: 减少标签层级, 减小内存占用
2.Teleport
3.Suspense
其他vue3新特性 1.全局API的转移
Vue 2.x 有许多全局 API 和配置。
例如:注册全局组件、注册全局指令等。
1 2 3 4 5 6 7 8 9 10 11 12 Vue .component ('MyButton' , {data : () => ({count : 0 template : '<button @click="count++">Clicked {{ count }} times.</button>' Vue .directive ('focus' , {inserted : el =>focus ()
Vue3.0中对这些API做出了调整:
2.其他改变
